Here's my "curvy" bodice. It does, as the dress engineer pointed out, look more like a girl than the others. It's worn over my Italian camicia, which is way too full and is adding a bunch of fluff at the top that's not really there. So bear in mind that over a more modest chemise it'll be a little more discreet. As in, a little less like I should be serving beer to men singing in German.
The pattern for this is basically my Venetian bodice, minus the cut-out, minus the butt-point, minus some of the length, and plus a curved front. It provides zero compression in the midriff, which was kind of what I had in mind, although having a curvy belly wasn't so much what I had in mind. Oh well. Mostly, it provides under-bust compression. The curved front I got by first creating a mock-up that met in the middle all the way up and wasn't uncomfortably tight in the bosom (but didn't support beans), then cutting out the under-bust curve repeatedly until it actually provided some support. The curve is more pronounced than anything in the Alcega book for certain sure. I wasn't going for historical accuracy here, just a combination of comfort, ease of putting on, and the desired shape. I'm thinking this will work for the Flemish working woman, a German dress, and perhaps some of the earlier period stuff I'm thinking about. I don't know if any of these folks wore such a thing, but I'm just not going out the door without some sort of undergarment.
The materials: The side that's showing now is some sort of cheap cotton twill. The other side is cream-colored duck. It's reversible, depending on mood I suppose. That was an accident...I didn't have enough of either fabric. It's corded with two strands of hemp per approximately 1/4 inch channel. I ended the cording about 2 inches below each armscythe for comfort. Most of the cording angles to the front. There are a few vertical channels in the back, and there's a channel following the curve in the front so the eyelets don't rip out. That channel got added after the slanty bits were corded and sewn in place. Oh, and I only got about an inch of shrinkage for the whole circumferrence when I corded it.
Monday, June 27, 2005
Friday, June 24, 2005
the flemish dress begins
Having had a pretty much sewing-free week following our weekend of playing at being Venetian courtesans, I think I'm ready for the next thing. Julie and I have decided that sewing in tandem is entertaining, so we've agreed on a Flemish peasant-y kind of thing for next. She's documenting this in a new diary....I'm just continuing on in this one. The final page of each outfit will be listed in the links to the right. I'm just not remotely a web programmer, so this'll have to suffice.
So the next thing, then, is something relatively cool and comfortable, with not-so-excessive skirts and not-so-stiff bodices. Drea Leed and Jen Thompson have done beautiful write-ups on their research on the Flemish working-woman, and I'll be leaning heavily on their interpretations.
I've been tinkering around a bit with a corded bodice to get that "can't be wearing a stiff corset while I'm weeding these vegetables now can I?" curvy lower class sort of look. I couldn't tell you whether the class of woman I'm trying to be would have worn one, but I'm darn well going to have a support system of some sort. Being as I don't do anything original if not necessary (hey, I'm a scientist...I go look at the literature ...always ), I first tried the basic shape of Jen Thompson's bodice. Well, except for being back-lacing and from a different pattern. But basically, rather straight. Hers ended up being curvy and supportive-looking. Mine ended up being kind of awful. To get enough support, I was lacing it tightly enough to make "pancake boobies." And since the lines on it were pretty straight, as much flesh went down as up, resulting in "pancake boobies near my waist" which was not a pretty thing. Loosening it up a bit alleviated that problem, but left me feeling as though things might...um....plummet or something. It also left weird bulges here and there. I mean, I know I'm bulgy, but not in this way. These shots are the loosened up version, since the tight version was so very very bad. Whereas this version is merely "very bad."
I'm obviously not going to wear something that makes me feel so ugly (the horned hairdo of the Venetian outfit notwithstanding), so I've been looking around at other ideas. Melissa of Sempstress did a trial of a front-closing corset with a slight curve in front, here. It's mighty pretty. I don't know what she boned it with, but something reasonably stiff, given the resulting line. I was thinking that if I used cording instead to soften the curve a bit and also made the under-bosom cut in a little more pronounced, I could perhaps approach the buxom silhouettes of the portraits. Or that of the St. Pauli girl. Which would be no bad thing. But I digress. I don't have pictures of the new version yet as I'm working on binding and eyelets, but the dress engineer's response was "hey, you actually look like a girl in that one" so I'll take that as positive. I'll try to take some pictures of the bodice and pattern this weekend to post.
Monday, June 20, 2005
Let me explain…no, there is too much. Let me sum up.
There isn't a whole lot of point in my iterating our weekend point-by-point, as Julie has done so in a much better way than I ever could in her last two entries. I knew that there was an advantage to being lazy. Likewise, she's posted way more pictures than I ever took on her blog, so I'd suggest traipsing on over there instead.
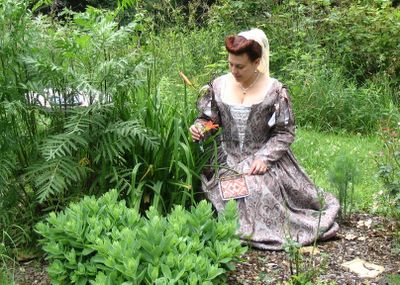
What? You're still here? Oh ok then, here's my favorite picture of the bunch, taken by the dress engineer:
Why am I kneeling in an herb garden you ask? What has this to do with Venice, you ask? I dunno. But I think it's pretty. The herb garden that is. And my dress actually. And my head isn't exploding in this one for some reason.
I was going to send Julie this picture for her blog, but since she has approximately a trillion more pictures than I do, I'm posting it here. Isn't her hair beautiful?
Here we are sitting on the transformer (oh, um.....renaissancey box thing I mean) in my front yard. I think I should permanently park some dresses on top of it, as it looks much better that way. Most of these pictures were marred by one or the other of us making an awful face at either the sun, the gnats, or Julie's fantastically out-of-tune guitar, which is nonetheless really cute. In this picture, we actually managed to pretend that everything was lovely. Or else Julie wasn't actually playing. It could be that.
I don't actually have any pictures from the fair itself because I completely forgot to take the camera out. There are many on Julie's blog, so go look. Right then. My comments on the day:
1. The Virginia faire people are the nicest ever. Ever. I noticed this last year too. They are so darn welcoming and friendly. And they like to play. And they like you to play. And they don't mind if you crash their shade.
2. Alpacas are cute. Greyhounds are cuter. And they have way more fur than my dog....are you listening, Mr. We-can't-have-a-greyhound-'cause-it-might-get-cold?
3. Why is there a trash can growing out of my shoulder in every picture Julie took? Did I just migrate to the trash cans?
4. My dress grew a couple of inches. It's bizarre. In my living room three weeks ago, the length was perfect. Now it's too long. I think maybe my felted pleats settled some. Sounds like a good reason for some chopines, eh?
That's about it. I had a wonderful time with my good buddies, ate some delicious fudge, talked to lots of nice folks. Stood around being excessively warm in the dress and making squinty faces at cameras. Looking forward to doing it again in October!
Ok, I lied. One last shot, doing my best shoulders back, flag-fan erect, doofy-grin pose. And as much as I hate this hairdo, I think it was the right look for the day.
Wednesday, June 15, 2005
stupid partlet
Ok, so the partlet is officially done. It is also officially going in a storage bin, not to be seen again for a very long time. If ever. It's not that it didn't come out nicely, 'cause it did. Which it should have, given all the effort. I finished the trim this morning, snapped a few photos, pinned it in place, and voila.....it looks stupid with the dress. It's a combination of factors really....the clashing color, the clashing motif, the fact that the mesh size is too large given the narrower shoulders that I did (not enough repeats visible). It just generally looks bad. Kind of made me a bit sad this morning, but oh well. I'll keep it just in case in the future I ever make a dress that would work with it. Like maybe a solid-colored dress. Or one with period shoulder straps. Or Anita's red velvet even. If it happens to be the right size and shape for her dress, which we'll just have to see.
At any rate, since I'd taken the pictures this morning, here you go. This is a close-up of the edging. I've also put in a piece of the original stuff I was using for cording and a piece of the braided trim I made with it. I used the loopy braiding technique used for junior high friendship bracelets to do this while camping this weekend, which is just bizarre, since it appears that Julie was using the same technique to make attachment loops for her sleeves this weekend. Sometimes it's vaguely alarming how much we think alike.
And here we have the poor pathetic partlet spread out on my not-at-all-vacuumed carpet. I took any number of shots, all without getting at least the cat's head in the picture. He was pretty fascinated by it.
Actually, he either was trying to tell me how awful it was, or he really wanted his head scratched. Here's the sequence of photos as he rolls his tubby little self all over my nice new partlet. And manages to immobilize me in the process.
Either way, the cat won. The partlet lost. And good riddance.
So that about wraps it up for this outfit, and a whole three days early to boot. Yes, I know that I could try to put together another partlet. But I'm partlet-ed out, thanks. I'll wear it with a bare bosom and lie to myself that I'm going to make a replacement for October. Probably no more posts until this weekend, when the lovely Julie, Anita, and I will be testing these out for the first time. Cheers!
Monday, June 06, 2005
that didn't work so well
"I'll just whip out a partlet this weekend and be done, done DONE!" - famous last words.
Aside from getting side-tracked by redoing the veil (which I like a lot better now, thank you very much), the partlet is turning out to be a pain in the patoot. I thought that one of those gold net kind of partlets would be very nice indeed. And really, how hard could it be? So I made a little mock-up out of a hideous jungle print, got the dress engineer to trace the neckline of the dress on it, and cut it out. I laid this down on some backing fabric - leftover cotton veil stuff to be exact - cut an inch around, pinned it to a box, and started adding cord. The box idea came from Alyxx, and it's quite ingenious, at least when executed properly. Which I didn't do. There were at least two ways in which I didn't execute this correctly. It looked pretty nice on the box:
Then came time to shift the piece around, which was when I discovered that (1) I had drawn the fabric and cords to different tensions, so when released it became a puckered mess and (2) I hadn't finished the edges before I tacked it on there, so ravelling had eaten up my extra (which wasn't enough to begin with anyway), as well as eating into the section that was supposed to show. Lots of hours tacking all those little points down the drain. Bah.
I'm trying again, with several changes. I switched to a more tightly woven (although synthetic) fabric that I hope won't shift as much on the bias. I got a much bigger box. I didn't cut the partlet out. At the moment, I'm tacking down the diamond pattern with it on the box, then I'll trace and all. The fabric will have to unravel about 8 inches from each side at present, so let's hope that doesn't happen. Oh, and I'm also tying the knots from the front, not the back. This was the view from the back.....owie, ow, ow every few minutes when I'd forget about the pins.
Sunday, June 05, 2005
saga of the veil
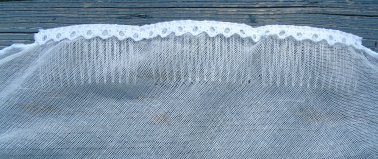
So I've been pretty so-so on the veil thing all along. A couple of posts ago, I showed an edging that I'd put on the veil. I decided that I didn't like it, so I ripped that off and did a kind of rolled hem on it with a whole lot of machine stitching to hold it in place. I also re-attached the combs more neatly at the top, bound the top edge with a satin ribbon, and tacked a bit of leftover lace on top just to kind of clean up the edge a bit:
This was kind of pretty actually, but I kept wanting to hum the bridal theme. And I really hate weddings, so it was no good. I woke up this morning thinking to myself, "Self, why don't you dye it if you hate the white veil so much?" "But Self," I replied, "I haven't got any dyes." "Silly Self," I said, "why not use something from around the house?"
Ok, enough of the weird conversation wtih myself. Suffice it to say, I cut a scrap of leftover fabric and got cracking. I tried jasmine tea first. It looks yellow in my cup so I figured it might work. It didn't. Maybe it would have at a stronger concentration, but I decided I didn't really like the color in the pot either. Then I remembered that people like to use onion peels. I'd like to pretend that I did a lot of research and all, but really, I just rummaged in the fridge and trash can (ew...I know) for some onion skins, popped them in a pot, and tried it out, like so:
It seemed to work on my swatch, so I strained out the peels and dumped in my poor veil, fabric, edging, satin, combs, lace, and all.
I threw in some vinegar for good measure, which in retrospect might have been exactly the wrong pH for a plant-based fabric, but whatever. I mixed it a bit and went back to sewing. Some random time later (more than 20 minutes, less than an hour), I remembered it and rinsed it out. And surprisingly, it worked out to more or less exactly the color I wanted. It's kind of a muted yellow-orange-gold (the dress engineer called it "onion-colored"....sigh). It's a whole lot less bridal white at any rate. Here's my attempt to reproduce the color on the computer....take it with a grain of salt, as it didn't photograph very well.
What surpised me was that everything took the color. I figured that the polyester thread, cotton fabric, mystery ribbon, and cotton lace would all absorb differently, making a big mess and a good excuse to get rid of the veil, but they're pretty uniform. What surprised me even more was the couple of spots I'd used a bit of anti-fray stuff. I figured the glue bits wouldn't absorb color. Instead, they turned orange. Bizarre chemistry stuff no doubt. I'll have to do something about that.
Anyway, a comprehensive guide to dyeing with onion skins this is not, but if I can do it so randomly and have it work, it's obviously pretty darn easy.
Thursday, June 02, 2005
inch inch inch
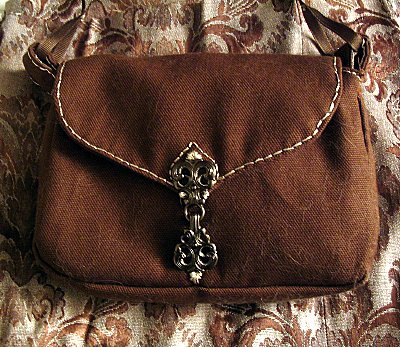
Shockingly, I actually got something done on my Venetian dress, or rather, the accessories for it. Anita can attest that I actually finished the stupid pouch thing. It's quite ordinary, but it'll serve.
Happily, Anita was there to assure me that, no, I shouldn't add more embellishment. She was possibly hoping that I'd actually pull out some knitting and join her if I quit messing with the purse. That's pretty funny, huh? Anyway, I then proceeded to go home and kick the flag fan's butt. Oh yes. I've been putting off this little project because (1) I hate to paint and (2) I knew I'd have to dig out the drill. Actually though, this was a really fun little evening thing. Lots of glue, lots of mess, both still all over the kitchen table. The body of the flag itself is just matte photo paper, since I never found a fabric I liked. Sandwiched between the outer paper layers are two pieces of stiffer paper (unused Christmas cards actually), and glued between these two layers are the wire supports, which splay out into curlicues in the hopes that they'll stay put. I set a 10-pound weight on top of the paper layers for a bit to flatten and dry (and the dress engineer said I'd never use those weights....silly man!). I then basted some lace around the edge and stitched a ribbon over the edges on both sides. It ended up being quite sturdy, although I actually bent my poor needle trying to go through the layers. Kinda pretty, isn't it?
Oh and Julie, I learned something obvious about drilling. Putting biggish holes in smallish beads is kind of exciting. I had them clamped in a vise and periodically one would just crack in half. I found that if you used a series of drill bits gradually increasing in size it resulted in a lot less casualties. Just a thought, since your wood bits don't look like they came in a pack of 100 like mine. That or get your dad to do it, eh? He undoubtedly already knows this....I discovered it by dint of much swearing.
Wednesday, June 01, 2005
hairspray
Okay, so I didn't actually work on the flag fan last night as I sort of implied I would. However, I did finish off my veil and play with my hair. I don't have a whole lot of hair, so I bought myself some. Now, I know this isn't the most elaborate or authentic hairdo in the world, but I thought a tack-on bun would be a handy start, so I got one here. It's in a color that more or less matches my hair when relatively recently dyed, which it's currently not. I'll rectify that before the deadline. Anyway, this was cheap and easy, and I'd planned to cover it with a veil anyway.
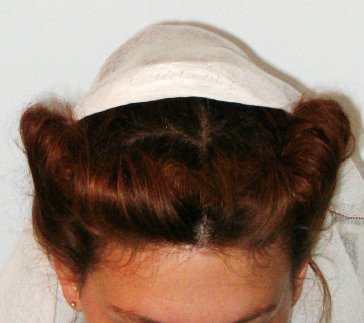
One of the Venetian oddities was a horned hairdo. Bella has a really wonderful description of this phenomena at her website, located here (towards the bottom of the page). For whatever reason, the Venetian women thought it would be really attractive to roll and twist the front of their hair into sort of a v-shape that got worse and worse until it was horns. Oh my. Anyway, my personal opinion of the look aside, this is a unique look for Venice, so I thought I'd try to recreate it. I'm sure they didn't have hairspray to work with, but I'm equally sure I can't do this without hairspray. I don't even dry my hair on the way to work normally, so hair isn't really my area of expertise. Anyway, to do this style, I divided my hair across the top ear-to-ear, then pulled the back into a ponytail to anchor the fake bun. The front I then doused with hairspray and teased to within an inch of its life. Once it was 5 times the normal volume, I just kind of made a roll of it while encouraging more of the hair to go outward towards where I wanted the "horns." Then I tried to smooth over the front a little. It's got a couple of bobby pins in there for good measure. This stayed up all evening, which kind of surprised me. I think for wearing it outside, it'll get a whole lot more bobby pins and a lacquer-like coating of hairspray on the surface.
Here's the show from the side to kind of show you how the bun works out. The veil's just attached with a comb. It may get attached with a couple more combs actually.
There are exceedingly cool pictures of Venetian women wearing huge enveloping black veils that practically hit the ground and wrap around the front. I like those a lot, but realistically, there's no way I'll tolerate that in the heat, so my veil is white, made of really loosely woven cotton, and only comes down to my derriere. Actually, it was supposed to be a bit longer than that. We won't really discuss what happened. Tip: when you even something up, it's better to cut off of the long side, not the short side. Duh. The edging on it is by machine. I know it's against my "no machine stitching showing" rule, but it's a really long edge, right? I zig-zagged over some leftover metallic embroidery floss. It's subtle-ish, but kind of gleams now and again in the light.
And for the entertainment of those who know me, here's what my hair looked like when I tried to take it down. Helloooooo 80's. Why couldn't I figure out how to do this in the 80's, I ask you? Maybe I'd have been in with the cool kids. Just needs some mall bangs.
Subscribe to:
Posts (Atom)