So a good rule of thumb is never to ask the dress engineer his opinion unless you're prepared to hear the answer. One would think his professional integrity was at stake or something. For example:
Me: Honey, how does this look?
Him: Hm. It looks fine.
Me: *narrowed eyes* Fine?
Him: No, no, what I mean is, it's nice. Really nice. Except, well....never mind. It's lovely.
Me: *deep sigh* So what does it need?
Him: Well, if you did this and that and the other thing altogether, it would be so much better, don't you see?
And then I go do another afternoon's worth of handsewing. Rinse and repeat. The trouble is, he's always right. He's got a better eye for things like balance in design.
This is possibly not the olive green wool kirtle I perhaps mentioned in the last post as THE PLAN. And I always stick to the plan. As evidenced as all the other times that I stuck to the plan.
Oh, and new rule. In addition to the "no machine stitching showing" rule, I now have "the insides have to be finished too." So we've got french seams and flat-felled seams and hand-stitched linings. And you know what? That rule's actually making me pretty happy.
Sunday, November 05, 2006
Saturday, October 28, 2006
i see london. and possibly france.
New underpinnings! The Queen Elizabeth effigy corset, courtesy of the Tudor Tailor. (Have I mentioned how much I love that book? And that I'm within a size of the example patterns? Can I get a "huzzah"?) Executed in navy blue duck with pale blue edging. Boned with 3/8" electrical ties. Plus some super tacky flannel drawers. Ugly, but necessary to play dress-up outside in November. They should be quite cozy under the farthingale.
And the back view. I do love the "racer" style straps, as they are assuredly staying put on the shoulders. Very nice that.
And a close-up. The flannel britches are pretty low-slung by design, strictly for ye olde privy convenience. They've got elastic instead of ties for much the same reason. I'm pretty sure if I tried to mess with ties under my 10 pounds of skirts and whatnot, well....it would be bad. Very bad.
A pretty easy task, not counting how eternal it is to bind 34 eyelets by hand. I even finished the inside seams (gasp!) because I think this one is a keeper. Third time's the charm perhaps, but this is the most comfortable corset yet, and also the most inclined towards the ideal cone shape.
Next up: a warm wool kirtle in olive. Making a total three green dresses. No, I'm not in a rut.
Wednesday, October 25, 2006
stuff! we love stuff!
My dear Auntie Tina, purveyor of wondrous jewels, mentioned that she feels the urge to shop and was wondering what sorts of stuff we like. Well now! We like all sorts of stuff, Auntie Tina! Here’s an enormous list of the things I keep my eyes open for when I’m in thrift shops or at garage sales.
P.S. Auntie Tina – do pop over and check out what Julie did with one of those fantastic ostrich feathers….so pretty!
P.P.S. New project underway - more posts soon!
Textiles
--Any sort of old garment for cheap that is made of 100% wool, silk, or linen in a solid color. We can reuse the fabric for accessories, trim, guards, hatbands…you name it! The color isn’t that important since we love to mess with overdyeing things (with humorous results much of the time… we are especially good at inadvertently turning things pink that are intended for our husband’s outfits…oopsie.)
--Anything cheap and leather in a natural color (or black). Leather is great for bindings and accessories like gloves or belts.
--Leather gloves in natural colors. We’re thinking about trying our hand at embroidering cuffs for on gloves.
--Anything that looks handwoven, most likely in a solid color. Things like handwoven placemats are wonderful to use as coverings for our baskets (to conceal things like water bottles and cameras!)
Jewelry
--Brooches/pendants – Generally rather geometric, symmetric designs are good. They didn’t have a whole lot of fancy gemstone cuts then, so I remove rhinestones and replace them with other things. They loved pearls, so most anything with a stylized design in pearls can work. Heavy metal pendants such as the one I used on the end of my yellow silk girdle are fantastic.
--Earrings – I usually wear some sort of drop pearl earring.
--Enamel – Anything with squarish enamel settings is perfect. I keep an eye out for buttons, although I’ve yet to find any. They called these “ouches” and stuck them on anything that held still long enough!
Odds and ends
--Small wooden bowls or platters. These are really nice for arranging a little period lunchtime snack.
--Pewter or wooden goblets.
--Feathers – We’re always keeping an eye out for natural-colored feathers for on hats.
Tuesday, October 10, 2006
shoes
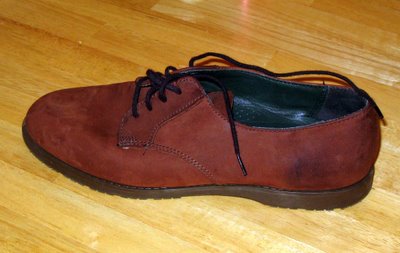
My "new" shoes admiring the beginnings of fall. I know, I know, they don't look like much. They look like someone took some rather dull scissors to a pair of really ugly shoes that're about an inch too long on me. They also look rather like that selfsame someone didn't bother to dig out some proper leather ties to model them. Whoopsie. Still, if by cutting up a pair of $1.50 shoes from a thrift store in a feeble attempt to look like latchet shoes will save me bunches of money on reproduction shoes...I'll do it. A website with handy do-it-yourself type instructions is located here.
I think I owned some just like this in junior high. Except possibly they were actually the right size. This style must be from back in the time when making your feet look small was the object, rather than making your feet look chunky and lug-soled. Ah, I do love me some chunky shoes. Nonethless, Behold the wondrous outdatedness.
Stay tuned for me cutting up a pair of $2.00 (big spender!) shoes for the dress engineer. He's gonna be thrilled no doubt.
Monday, October 02, 2006
The Virginia Renaissance Faire was wonderful. Julie and I were lucky enough to join Her Majesty's Hounds for the day.
I wore my new kirtle and loose gown. Although I hadn't finished a number of things (such as fasteners and the sleeves), it did well enough. I don't think I'd want to wear it on a hot day.
I did also get to play the harp a bit with Musica Gallica, a harp and recorder duo. Happily, the harpist is my teacher Whitney, and she's a professional so my shortcomings went unnoticed. Or so I certainly hope. Julie did call me "renaissance harp armcandy." You can kind of tell by my expression in this picture that it's taking a lot of concentration. Or possibly I just look like that all the time? Don't answer that.
And of course, one picture of a dog doing what a dog does best. Check out Killian's pooping skills (on the right.) Yes, I'm one of those people. Those people who think pooping dogs are hilarious. And period! Now hand me ye olde plastic bag.
Wednesday, September 27, 2006
hats....my favorite part
One French hood, no crescent. I think it's a lot fancier than I'd originally intended, but it's hard not to get carried away with the pearls. Guess I just inflated myself to "Lady" Bess.
As worn here over my hair fresh from the shower, it isn't quite what I have in mind, but I think if I frizzle and/or roll the front hair to make the Elizabethan heart-shaped frame for the face, it might be about right. It's pretty anyway.
Monday, September 25, 2006
warning, boring list ahead
Now then, since Julie put up her to-do list, I thought maybe I ought to actually consider what needs doing by Friday. Really I’ve got a couple of options. I was thinking of wearing the green dress on day and the loose gown the other. Here’s what I’d need to do to make each happen.
If I want to wear the loose gown and French hood:
1. Finish the sleeve embellishment on the loose gown.
2. Line and edge the gown.
3. Cover the hood, sew on jewels, and make the veil.
4. Hem the kirtle.
5. Add my silly little “utility loops” to the kirtle. That or put a pocket in the surcoat.
6. Make a silk sash to hang the girdle pendant on.
7. Find something to hang my Madonna miniature on.
If I want to wear the new-and-improved (yet again) green dress ensemble.
1. Add loops to the armholes of the bodice for the sleeve points.
2. Replace the hat-feather and put a pin on there.
3. Starch the heck out of my poor little wilted partlet.
4. Maybe take up the hem on the grey underskirt as I was tripping on it last time. Maybe not though, since the terrain will be flat this time.
Clearly the green dress is a quicker option, but I didn’t spend all weekend sewing so I could wear an old dress. I think the green dress list could readily be done the night before if I get in a bind, so the plan is to finish whatever I can of the loose gown outfit by Friday. If it’s not wearable by then, I’ll switch gears.
Oh, and here’s the French hood picture that I was modeling mine after (William Brooke, 10th Lord of Cobham and his Family by an artist of the British School, 1567), taken with appreciation from http://www.tudor-portraits.com. I’m particularly fond of the one on the lady on the right with the little point in the middle, although I’m going to go a row of billiaments at the front too.
all that for this?
So something like 15 hours of work after the last picture, we have this:
Wow. Couching is slow. Ok, ok, I know it's fast relative to any other kind of embellishment, but jeepers. I think I bit off more than I should have. However, the gown is down to embellishment on the sleeves and addition of lining and hem. I think I'm going to skip the fancy-pants dagged border on the sleeves for now and put a "temporary" velvet strip at the bottom instead to save time. And sanity.
Here's the other thing I did yesterday when I could no longer stand the couching. It's going to be a late-ish French hood sans crescent. It's wired with electrical wiring rather than millinery stuff because it was late and the husband had that on hand. Seems appropriate anyway, considering that the sleeves have electrical cable ties in them. It's the all-Home-Depot-all-the-time outfit. I'll dig up a picture of what I'm shooting for next time. Basically, I tried on this outfit with every it of headwear I had and it all looked silly. Erm, sillier than usual. Cheers.
Saturday, September 23, 2006
linebacker
So here's where I'm at halfway through the weekend. The dress engineer says I look "imposing" in this. I'm going to go ahead and assume he means well. There's no lining, no edging, no hem, no gussying up of the collar, and I've only put about half of the various velvet bits on here, but you get the idea. It's big. It's dark. It's....imposing, I guess?
Here's a close-up of how I'm couching satin cord and lots of cat hair onto the velvet strips. I don't apparently sew any straighter by hand than I do on the machine, but from a little further away than this the effect is kind of nice.
Friday, September 22, 2006
one week (but who's counting?)
Indeed, one week to the faire in Salem. It's about time to get going on this project, no?
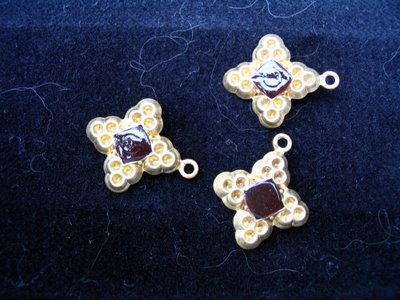
So first of all, just for Julie, some more pictures of ouches. All ouches, all the time.
These have been filled in with the sort of paint one uses to make fake stained glass windows. They're somewhat lumpy because the paint shrank a lot each time it dried, so I kept adding more. The one on the bottom right is not so lumpy. I found it stuck to the bottle (thank you cats). I'm thinking about trying to stick the rest to the bottle too, just to smooth them out. In principle, these would go on the little hood I'd like to make to go with the loose gown/ropa. That would of course, depend on me getting done with said gown.
More pictures for Julie - these are the enormous ostrich feathers courtesy of Auntie Tina. The ruler is 18" for scale, so they are, as I said, enormous. Do let me know if any of these will suit your mad hatter hat. I like them all, so don't be shy.
And finally, a really bad shot of the back of the gown. I'm working on applying the velvet strips. Yes, I'm machine stitching the long parts of these, but that will be covered with couched cord, so I think it's ok in this case. I'm discovering just how bad I am at stitching straight.
I do love this velvet. It's the thickest, plushest cotton velvet ever. There are assorted other velvet strips yet to be applied, but you get the idea. I have started the couching as well, but failed wretchedly at taking a picture of shiny black cord on shiny black velvet on dark grey wool. I'll try again on a sunnier day perhaps. Oh, and is not my sewing area a disaster? I can't even identify all the junk behind the gown on my desk. And chair. And other chair. Etc.
That's all so far...but with a one week deadline I daresay there will be more to come.
Wednesday, September 06, 2006
shiny object over here
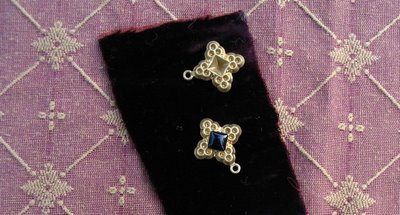
Er....it's possible that I haven't done any actual sewing for a week. I have, however, been shopping. These are approximately 7/8" (including the loop) costume jewelry bits that I'm thinking will be nice as ouches on either my Tudor gown or my late gable hood. I got them from this place. I haven't made up my mind about the settings as they look pretty plastic-y (go figure) to me. I was wondering about some sort of enamel instead. I might just have to check that out. I've got extra loops to glue on so I can sew these onto fabric.
Speaking of fabric, I have 9 yards of the velvet shown above on its way to me from Class Acts Fabric. Linda (the owner) is mighty nice and I've been eyeballing this fabric for several months. The plan is to make up a Tudor gown from the velvet after I get the loose gown together. Ahem. Yes. That's the plan. And we always stick to plans, no?
Monday, August 28, 2006
just when you thought the photography couldn't get worse...
Oh but it can. First, here's the picture of the surgery I did on the kirtle neckline to give it an arch (so I can ultimately use this as the foundation for a Tudor outfit too). Here's the old version. I've also sewn up the straps, added a pretty wide (maybe about 15 inches) band of patterned fabric around the bottom edge on the back half of the kirtle, made a set of very plain, slightly curved sleeves, and added attachment points to connect said sleeves with the kirtle. But none of that is worth getting dressed up to take a picture of, so you just get the neckline. Incidentally, how the heck did the Tudor women get their chemise necklines to line up so nicely with an arched kirtle? Did they have a special chemise for each dress? 'Cause I seem to be approaching that.
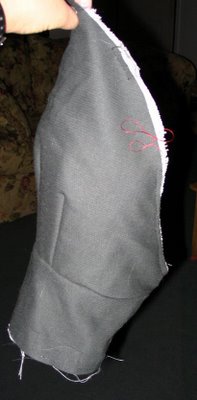
I also started work on the loose gown to go over this kirtle. Many thanks to Julie for a link to a full-length picture of the original, here. I started with the sleeves, since those are the tricky bit. I studied PoF, I studied TT, and then, you know, I decided to do whatever I wanted. Here's the top half of the sleeve. I decided that this would be stiffened with two widths of the ever-handy electrical ties. A half-inch cable tie runs through the long curved channel and 4 quarter-inch ties run perpendicular (more or less) to it. Oh - and can you believe I took a picture of grey fabric on a grey cutting board? Yes. Brilliant.
I arranged for intersecting channels so that the plastic ties could form a sort of skeleton, and tinkered with which to put on top for the smoothest effect. Here's what the basic shape of the sleeve will be, except that the top will be gathered down into the armscythe. The original actually achieved this by some cleverly curved pieces. I'm lazy.
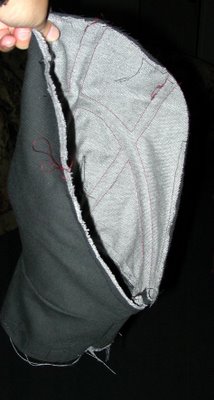
Here's the inside of the proto-sleeve. It'll have a lining to hide all the ugliness. Also, you can kind of see here where I zig-zagged for the dagged edge. I decided not to cut that until I'm ready to bind it.
Tuesday, August 08, 2006
progress despite cluelessnesss
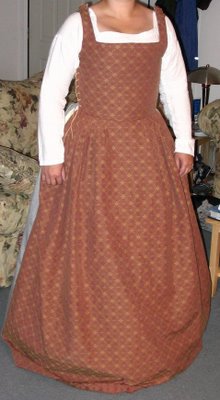
Apparently my bad camera karma continues. I believe I mentioned yesterday that I'd taken pictures of my kirtle-in-progress over the weekend. Well, last night I realized that I'd made the neckline square instead of arched, which would have been ok normally, but not so good for the planned Tudor costume. So I did some minor surgery on the bodice and gave it an arched neckline. I decided that it was worth lacing it up and snapping some replacement photos. Sadly, those photos were so similar that when I finally looked at what I'd saved, I realized that I'd managed to delete all the new ones, leaving only the old ones. Which I present below, since I'm not excited about dressing up again for the same pictures a third time! Just imagine that the neckline has an upward arch, as it now does. And, um, also imagine that the straps are sewn together and that it has a hem.
The kirtle is made primarily of a cotton fabric with a diamond/flower pattern woven in. I'm rather fond of this fabric, as I bought it with Julie on a day-long fabric expedition. I'm pretty sure it was meant to be made into something else at the time, but no matter.
The back of the skirt is made of a very heavy cheap grey cotton (the bodice is lined and interlined with the same stuff actually). The idea here is that the back of this will not be showing anyway, so why not be frugal. Very period that. I'll be adding a wide band of the patterned fabric to the back at the bottom in case the overgown pulls up, but I need to cut out the sleeves first to determine how much width I have left for that. This idea may be found in both Janet Arnold's Patterns of Fashion and also the new Tudor Tailor book.
The first outfit this kirtle is going to support will be a loose gown, based on a 1570's-80's black velvet gown out of Patterns of Fashion, like so:
I've wanted this gown for years. The original was worn over a loose kirtle, which was probably very handy if one was, say, breeding. As I'm not, I decided it could go over a fitted kirtle. Indeed, sometimes these were worn over full doublet-style gowns and whatnot, but that would be entirely too hot for Virginia!
This gown will be made of a lightweight dark grey wool flatlined with more of that ugly heavy grey cotton as in the kirtle above. The plan is to baste those two layers together, apply the decoration (bands of black velvet and satin cord), then stitch in a lining of fine grey linen. I hope it works!
Monday, August 07, 2006
more sparklies and the next plan
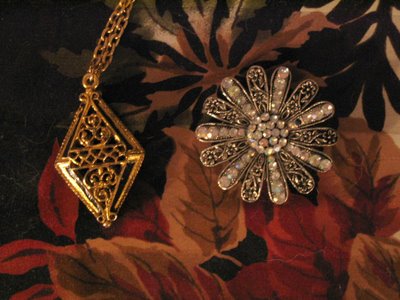
Check out these additional goodies from Auntie Tina! The two baubles above are about two and a half inches long. The kite-shaped filigree cage is most likely going to swing on the end of a silk girdle for my next outfit. I think that'll be very cool. The round pin is going to go on my giant hat as soon as I replace the rhinestones with pearls and whatnot, along with one of the perfectly enormous ostrich plumes that Auntie sent as well. I didn't get a good picture of those (the dog wouldn't hold still!) but they are at least two feet long and amazingly full. Truly Lady Kytson worthy feathers! I need to tinker with the hatband to get those on there and then I'll post a new picture of the hat.
This item I love as well. Again, I'll replace the rhinestones with something else, but this item is a good five inches across and SO ornate. I am thinking it is going to be some sort of center item on the Spanish court gown that I'm planning. That's going to be a little ways down the road, as I have two other outfits I'm working on first, but I thought this was so cool that I wanted to show it now. There were other really cool jewelry items in the package as well, but I believe I'll save those pictures for when I'm ready to use them!
There was quite a bit of costuming this weekend, but as I forgot to load the pictures off the camera, that post will have to wait a bit. To summarize, I'm just about down with a kirtle that is going to multi-task as a fitted kirtle to go under a loose gown and also as the underlayer for a velvet Tudor gown. I don't have the velvet for the Tudor gown yet, so the middle-class loose gown is up first. For Julie and Anita - it's of the washed-out red and yellow diamond print we bought in Maryland. I'll have pictures tomorrow.
P.S. Thank you again Auntie Tina! You can't imagine how much fun I've had playing with the jewels. There's a surprise for you underway. It's going to take a little while, but I think you'll like it!
Tuesday, August 01, 2006
adornment
This lovely pendant was in a box of antique jewelry and textiles my Auntie Tina sent as a lovely surprise. There were all sorts of lovely pearls as well that I'll be wearing next time I go out in period costume. This pendent though....oh how I love it. I've wanted a miniature of some sort to wear and this is gorgeous!
Tuesday, July 11, 2006
again with the lousy photography
I should really get the dress engineer to photograph stuff for me. It's really hard to shoot a picture of one's own arm for instance. At any rate, here are the new sleeves (um, only sleeves) for my green-dress-of-continual-improvement. The sleeve is lying flat on the deck railing because of the aforementioned complete inability to take pictures of my own arm. However, aren't the hostas lovely?
The sleeves were done using Julie's basic sleeve pattern, which every time I discover is just a bit too small for me. It fits, but I'm not at all fond of snug sleeves. After I got it sewn together the first time, I decided that it would annoy me, so I took it apart and reinvented it as a sleeve with an opening down the front. So here's the front opening, and while it's maybe not what I would have originally envisioned, it's a lot more comfortable (and presumably cooler). Since I have only the tiniest scraps of green fabric left, this is going to have to do!
Subscribe to:
Posts (Atom)