So yep. I'm pretty bad at keeping up with a project. Been kind of busy. Anyway, I've got three or maybe four things left to do for this outfit: veil, pouch, flag fan, and perhaps a partlet. The pouch is almost done. Not that it's anything special, but I've still got a little bit of stitching to do on it, then I'll take a picture. Likewise, the veil is almost done. It's edged, I've bought the combs, I haven't attached them. So no picture either.
I'm using the lazy approach for the flag fan. I found a pretty picture of a Venetian brocade on La Couturiere Parisienne, which is incidentally a really cool site for looking at art. Here's the original:
It's mighty pretty. So I tinkered around with it and made up a color and that sort of thing to yield this:
I printed this out last night on matte photo paper and am planning to do basically the strategy so kindly outlined at The Renaissance Tailor. I'd thought of using fabric, but haven't found any remnants around that I liked. I thought about painting, but, yeah.....that won't be happening.
Not so much progress really, but I'm awfully close to being done with the whole thing. The deadline's June 18, so I don't think I've got a problem, no matter how lazy I am and no matter how many times I plan to go camping between now and then. It's summer after all.
Tuesday, May 31, 2005
Wednesday, May 18, 2005
baubles
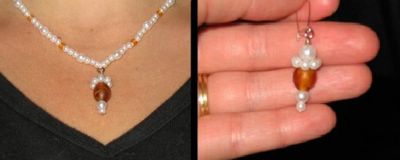
I finally figured out what I wanted in the center front of the girdle. Here we go:
I liked my little doo-dad so much that I made a necklace and earrings to match.
Yeah, that's pretty much all that I have to say about the jewelry. A jeweler I am not, but I can string beads. Oh, and that the godawful necklace I made a month ago is being taken apart. It looked stupid.
So I guess now all I need is a veil, some hair for pity's sake, a partlet (yuck), and some kind of pouch-ish thing since I don't have pockets. Or servants.
Tuesday, May 17, 2005
a walk in the woods
Whine, complain. Nope, I don't have a picture of the stomacher under the lacings. But here's something for the moment I guess...we got goofy and took the dress outside this weekend. Happily, the trees are out now, so the neighbors don't have to be baffled...
Here's a back view of the dress to give you a sense of how the hem turned out. It sweeps the ground just a bit as I walk. Thumbs up to the dress engineer for his valiant pinning.
Still need some accessories, obviously. And some hair, eh?
Here's a back view of the dress to give you a sense of how the hem turned out. It sweeps the ground just a bit as I walk. Thumbs up to the dress engineer for his valiant pinning.
Still need some accessories, obviously. And some hair, eh?
underwares
Haiku to Julie's camicia
it is so lovely
graceful gathers on the cuffs
redwork abounds here
Haiku to my camicia
eyelets on my wrists
no substitute for blackwork
oops, guess i cheated
Okay, I'll quit with the horrible poetry. So anyway, I didn't end up doing Julie's lovely custom-designed blackwork (scroll down past her humorous attempts to wriggle into a dress) on the camicia. I'm just not that sold on this chemise, and I can't see doing all that work on something I'm not too keen on....I'll save it for something else. In a vague attempt to pretty the camicia up a bit, I slapped some lace on there.
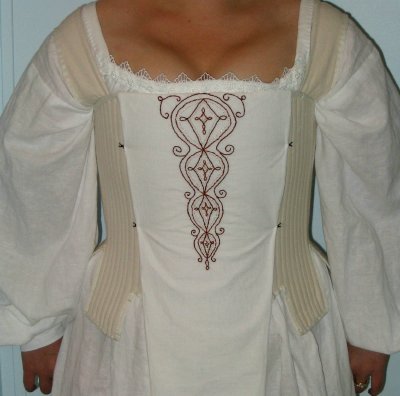
And because you haven't seen enough of me in my underwear yet, here's a second picture in which I've put on the corded petticoat as well. I'm kind of pleased with how this worked out. The stomacher/placket/dickey/whatever is attached to the corset with 9 sets of hook-and-eyes so that it can't wander off, but I can still use the corset for other ensembles. However, I left the bottom loose so that I can put my petticoat over the corset tabs, but under the stomacher/placket/dickey/whatever. Tricksy, no?
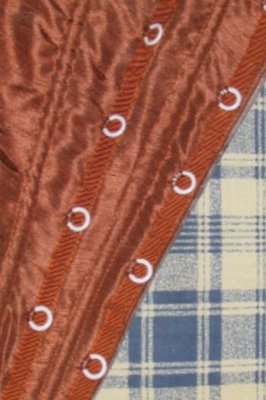
Oh and one other little change to the dress. I was having a hard time with lacing through the ribbon. I still think that Jen Thompson's concept is solid, it's just that when I switched to a larger diameter cord, I can no longer get it through the ribbon without a wrestling match. I could have ripped the ribbon out and tried again, but I thought that would be kind of difficult, since the first time I did it I didn't have the outer layer of fabric to worry about. I just left the ribbon in place and sewed in lacing rings (28 of the stupid things to be exact). This doesn't lace up quite as smoothly as the ribbon did, but it's a whole lot easier to deal with.
Tuesday, May 10, 2005
oh never mind, not so bummer after all
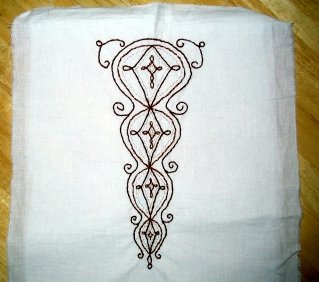
One of the bits I'd been trying to sort out was what to put under the front lacings. Some folks have worn the camicia over the corset, but that requires an extra layer under the corset. Yuck. Also, I don't really like my camicia all that well, so I was planning to have it show as little as possible. Some people have managed to wear their dress sans corset. I tried it. It was ugly, and I managed to saw through a couple of the ribbon lacing points trying to make it work. Tip: If you must use Christmas ribbon to test lace, be intelligent and don't pick the stiff, sharp, sawlike stuff. Duh. Anyway, I'd pretty much settled on option three: some kind of stomacher-like thing. There are several examples of the Venetian ladies having done so. My favorite is "Lady with Heron" which I've pretty much taken to mean that I can stitch whatever I want on it. I mean, I was going to do that anyway, but it's nice to pretend I wasn't just going to do whatever I wanted, right? Here's the design I'm planning to have under the lacings in front, which is pretty much completely random. I'm going to make this into a sort of trapezoidal piece that will be basted onto the corset to hold it steady.
And here's a little closer view. It's not anything spectacular, just backstitching with DMC floss.
Anyway, since Anita asked, here's the so-boring picture of me binding the hem. I had planned to do this out of lining fabric, but I was standing in Wal-mart when an evil imp suggested that quilt binding would be oh-so-much less effort. For a similar not-too-exciting outcome.
well, bummer
I had some pictures to post today. Unfortunately, I sent them to myself using some feature in the software which apparently scrambled them. So no pictures until I can try that again this evening.
In other incredibly dull news, I'm working on binding the hem of the dress. The hemming was dull. Marking the hem was moderately entertaining, since I employed the dress engineer and a new-to-me technique. Wish I could remember where I saw the idea, but at any rate, I put the dress on, then had the husband pin the skirt directly to the carpet. It worked really well. I was amazed actually. I've usually got the sagging, dragging hem with the too-short bit in the back. This one's actually right. The husband enjoyed this process too, mostly because of this:
*ring ring*
Aaron: Hang on, I'll get that.....oh hi there....no, no, this is a good time. I'm just pinning your daughter to the floor at the moment
Me(hissing): Don't...no...I'm going to kill you...ack I'm stuck to the floor. Come back here.
Aaron: .....no, it's no problem....she'd love to talk to you....uh huh......uh huh....yep she's like that.
Aaron: It's your mother.
Mom: Oh hello dear. Sounds like you're having fun!
Me: Stammer, mumble.
Friday, May 06, 2005
girdle
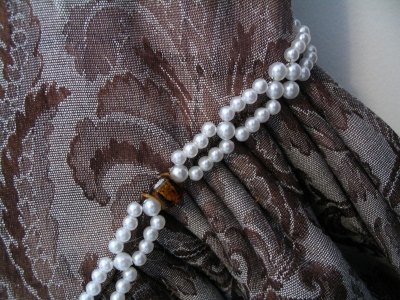
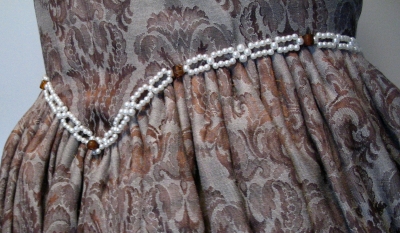
I made a girdle last night for the dress. You can see in the close-up that I tacked it directly onto the dress. Otherwise, what with the point in the back and all, it was mighty hard to convince the thing to behave. Oh, and this is on a hanger, not on me, so the dress is lookin' a little limp.
It's two sizes of fake pearls and amber-colored glass beads that match the beads I used on the sleeves. It's strung on a fine wire. I've had all of this stuff for a while, so this is a "free" girdle. The pearls actually date back to when I got married (5 years ago, egads). I had this notion that I was going to make some sort of pearly monstrosity for on my head. It's a good thing I didn't, eh? Now I have a gazillion pearl beads in assorted sizes.
Anyway, here's a shot of the back. This is over my blue jeans instead of all the assorted foundation garments and I'm just holding the front together, so there are some weird wrinkles, but pay no mind. Julie - the little puff directly above the point - that's what I was talking about with my outer fabric bridging. In this picture you can see it doing that. I'm beginning to think about the wisdom of placing a couple of judicious stitches in there to teach it some manners.
The front lacks about 4 more beads and a hook to close it, so no picture of that just yet. I was tired and Frodo and Sam had gotten safely across toward Mordor, so it seemed like a good time to quit. At any rate, this is going to be waist-length only, no pendant chain. I think it would be lost in the fabric anyway with this dress. I'll get a shot of the front when I lace this mess up so the dress engineer can mark my hem.
Thursday, May 05, 2005
help, i'm a giant couch
By popular demand (ok, by demand of Julie and Niter), here are a couple of shots of the giant-couch-of-doom dress in progress. A number of things still need to happen to it. Namely, it needs a hem, the sleeves are held on only by a single pin apiece at the moment, and yes, that's my plain old unadorned corset there. I'm thinking about what to do about that at the moment. So then, here are the front and back shots of the dress:
I think my favorite shot is the back. It kind of looks like those woodcuts, huh? I mean the bigness of the posterior and all. And let's all take a moment (Anita) to rejoice at the relative levelness of the motifs in the skirt. Yay math. I think the most obvious thing from these pictures is that the camicia needs work. I thought that I made the sleeves long enough to pull through the gaps in the sleeves, but obviously not. I think my sleeve lengths got skewed when I actually laced a bodice over them, since the body of the thing is so wide. Everything got kind of pulled up. Also, I don't like the neckline. It gaps and pooches and generally looks pretty poor. I'll have to look into it. The dress engineer was asking whether the camicia (ok, he said shirt) was supposed to show on the sides in the back and I had no idea. Anyone?
Other than that though, I'm not terribly displeased. You can see in the front shot how my fingers are disappearing into the piles upon piles of fabric on my hips, mostly due to the obnoxiously yellow felt underneath. The dress is half armor, half padding! And all couch.
Here's a shot of the front of the waist. Sorry about the Christmas ribbon again. It's hard to see what's going on (due to the insane amounts of busy-ness no doubt), but basically there's a 12 inch slit going down the front from the point. There's nothing holding it together at the moment, just lots of pleats. Julie, can you kind of see how the center two pleats are perpendicular to the floor? They're not trying to force the front slit open at all and it just sort of gets lost in the folds......just a thought for yours.
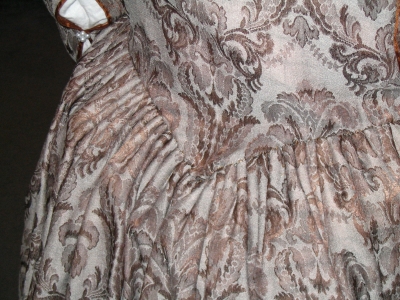
Here's the dress engineer's favorite shot.....the "butt boning." I think maybe I'm having less trouble here because I am simply not trying to pleat nearly as much fabric in there. You can see the pleats get a bit wonky in the middle, but I think it looks ok when I'm walking around. Also, the aforementioned butt boning doesn't quite go down into the point. There's about an inch of unboned bodice at the point. I don't remember why I did that, but I think that's helping prevent all those various stresses at that point too, since the fabric obviously gives more than boning does. Oh, and may I just say that this dress does nothing for butt-reduction. It's freakin' huge. Anyway.
And finally, just because I hammed for the camera and I think it's kind of funny:
I think my favorite shot is the back. It kind of looks like those woodcuts, huh? I mean the bigness of the posterior and all. And let's all take a moment (Anita) to rejoice at the relative levelness of the motifs in the skirt. Yay math. I think the most obvious thing from these pictures is that the camicia needs work. I thought that I made the sleeves long enough to pull through the gaps in the sleeves, but obviously not. I think my sleeve lengths got skewed when I actually laced a bodice over them, since the body of the thing is so wide. Everything got kind of pulled up. Also, I don't like the neckline. It gaps and pooches and generally looks pretty poor. I'll have to look into it. The dress engineer was asking whether the camicia (ok, he said shirt) was supposed to show on the sides in the back and I had no idea. Anyone?
Other than that though, I'm not terribly displeased. You can see in the front shot how my fingers are disappearing into the piles upon piles of fabric on my hips, mostly due to the obnoxiously yellow felt underneath. The dress is half armor, half padding! And all couch.
Here's a shot of the front of the waist. Sorry about the Christmas ribbon again. It's hard to see what's going on (due to the insane amounts of busy-ness no doubt), but basically there's a 12 inch slit going down the front from the point. There's nothing holding it together at the moment, just lots of pleats. Julie, can you kind of see how the center two pleats are perpendicular to the floor? They're not trying to force the front slit open at all and it just sort of gets lost in the folds......just a thought for yours.
Here's the dress engineer's favorite shot.....the "butt boning." I think maybe I'm having less trouble here because I am simply not trying to pleat nearly as much fabric in there. You can see the pleats get a bit wonky in the middle, but I think it looks ok when I'm walking around. Also, the aforementioned butt boning doesn't quite go down into the point. There's about an inch of unboned bodice at the point. I don't remember why I did that, but I think that's helping prevent all those various stresses at that point too, since the fabric obviously gives more than boning does. Oh, and may I just say that this dress does nothing for butt-reduction. It's freakin' huge. Anyway.
And finally, just because I hammed for the camera and I think it's kind of funny:
Tuesday, May 03, 2005
pleating like mad
I spent yesterday evening pleating up my skirt. I have long since decided not to line this skirt, mostly because it will be hot enough already and partly because I don't have enough fabric on hand to do so and I'm cheap. However, I thought that a little bit of padding in the pleats would be nice. To that end, I cut 3-inch strips of hideous yellow felt and zig-zagged them onto the top edge of my tube skirt. I then folded it over and ran three parallel rows of stitches through to pleat it. 3 inch strips seemed to be a nice compromise between providing a little extra lift to the skirt and having a shelf around my butt. Here's the view from the inside:
And here's the outside:
I forgot to take a picture of how nicely I matched the pattern on the skirt seams for Anita. Anita, you'll just have to take my word for it. Aaron approved. He's as particular about that stuff as you, so I think you'll like it.
And here's the outside:
I forgot to take a picture of how nicely I matched the pattern on the skirt seams for Anita. Anita, you'll just have to take my word for it. Aaron approved. He's as particular about that stuff as you, so I think you'll like it.
Sunday, May 01, 2005
my geometry teacher would be appalled
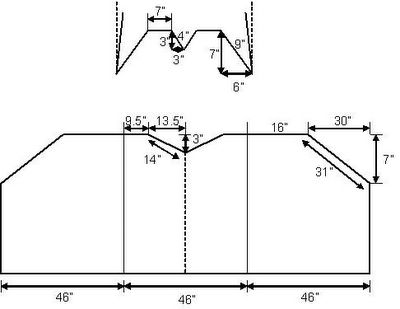
I'm working on a skirt for the eternal venetian dress. In the quest for fairly level motifs on this exceedingly patterned dress (ooh, look at the walking couch), I did a teensy bit of math. Let us all hope it's better than the math that gave me a waistband that was way too big, eh?
I'm sure that my 9th grade geometry teacher, my committee, and my local dress engineer would all be perfectly horrified at the simplifying assumptions. Yes, I'm aware that these don't scale perfectly. Yes, I'm aware that the cosine of a small angle isn't quite 1. Yes, I'm aware that one needs to take that into account. I did. Sort of. Roughly. And yes, yes, I know, the dress isn't composed of triangles. Assume the horse is a sphere already. It's close enough. I'm not doing calculus to get the curves just so. Especially considering how badly I pleat things.
Here are a couple of comments for the Julie-types, who might be giving this thing some thought.
1. I didn't get as much width as I thought, having to cut a swath off each side to get everything match up. Whoever makes the motifs not quite overlap at the edges of the fabric is a marketing genius. And I despise them for it.
2. I've been thinking about the front closure thing. Due to the gigantic dips front and back, the total waistline is 40". That really ought to go over in one direction or the other. I tried getting into the bodice with the bottom tied together. No way, no how. It's mysterious. It's sort of like that couch that is stuck in the stairway in the Dirk Gently book.
3. Since I'm resigned to having to do something to let me get into the dress, I decided to do so boldly. I'm putting a seam straight up the middle. I think it's better to have that than to end up trying to cut and face a slit in the middle of the panel. Also, it's forcing me to be honest about my ability to sew straight (and *gasp* use pins) a lot earlier in the process. The seam doesn't look half bad, and I'm planning to close it up with a multitude of hook and eye closures. Hope this works.
Subscribe to:
Posts (Atom)