I worked on the camicia last night. It's basically a T-tunic with a squarish neckhole. It's hemmed and all, just lacks cuffs and something at the neckline. I made up cuffs last night, had them all interfaced and sewn together and turned and pressed and pinned and all. Then I decided I didn't like them that heavy, so I'll be redoing without the interfacing. I usually like stiffer cuffs, but they just seemed out of proportion with the lightweightness of the rest of it. Oh well.
I figured I should check out how the camicia worked with the bodice before committing to sleeve attachment point placements, y'know?
Friday, April 29, 2005
Thursday, April 28, 2005
minor modifications
Spent the past couple of evenings doing a little tinkering with the bodice. Nothing too exciting to look at, but I redid the armscythe so that I can wear it without anything cutting in. Much more comfortable and mobile.
And for the dress engineer.....
I will not ignore your careful seam allowances.
I will not ignore your careful seam allowances.
I will not ignore your careful seam allowances.
I've also decided not to put contrasting edging on the V in the front of the bodice. I don't like my lining fabric well enough, I'm out of ribbon, and I think I might like it better this way anyhow. That being decided, I topstitched beside the edge-most boning strips on the front. That should help keep everything in place. I do wish my handsewing were prettier though.
No pictures. It looks essentially the same. Next up: sleeve attachment points.
Monday, April 25, 2005
necklace
So I had some bead clusters left over from the sleeves (once again, I apparently can't count) and got a little silly with them (being forced to watch Empire Strikes Back yet again will do that to a person). This is the result:
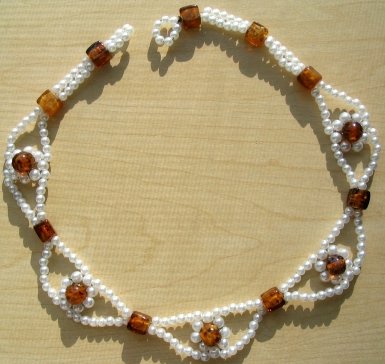

It would tie on with a bit of ribbon, and it's a bit longer than a choker, although it's sort of stiff and curved. I don't know whether I want to wear this or not. On one hand, it's frilly and girly and matches my dress and all. On the other hand, I was just planning to wear a simple string of pearls, which I'm sure is more period.
Any thoughts?
sleeves part 2
Lousy weather this weekend, but good for sewing. I did lots of fiddly hand-sewing this weekend, but the sleeves are done except for figuring out how to attach them to the bodice. I think I'm leaning towards tying them on (as opposed to hook and eye or buttons or something), but I'm procrastinating doing the eyelets until I make up my mind for sure. Here's the sleeve lying flat on my cutting board. It's kind of sad-looking all uninflated like this, but you can see the slits along the back that will hopefully be filled with camicia puffs. I say hopefully since I haven't actually tried it.

I had all sorts of ribbon angst this weekend. I didn't have enough to bind everything as I planned....more math dumbness I suppose. However, by taking the binding off of the bottom of the sleeve, shortening the sleeve by an inch, and doing some franken-sleeve piecing of the binding, it worked out. It makes the panes slightly less puffy, but at least everything matches. The dress engineer, while disappointed that he didn't get poke me with marking pens or anything, did manage to venture some opinions about placement of beads and whatnot.
Anyway, here's my trying on my sleeve over a random shirt. I found out that it's hard to take pictures of your own arm, but the photographer was asleep. I'll have to take some more attractive pictures later.
Tuesday, April 19, 2005
sleeves part 1
I've been working a bit on sleeves for the Venetian gown. We were out of town this weekend, so sewing was pretty much limited to what could be done by hand in the car. I want a fairly fitted sleeve with a paned top. The pictures below show the first couple of steps in the process. The sleeves are going to have three layers. The inner is the lining fabric from the bodice, which will show some as the panes move. The outer is the dress fabric. The middle is a layer of duck (mustard-colored in the pictures below) that is only extending down as far as the panes to give them a little stiffness. I left it out of the bottom half of the sleeves because it's going to be hot enough already. I experimented a bit with how to make panes without the fabric fraying all to bits and found that I got the best results by stitching the three layers together with a narrow machine zigzag before cutting. I have many yards of a thin grosgrain in a matching color that I'm going to use to bind the edges, but I found that trying to do that without the machine stitching underneath just caused everything to tear itself to pieces.

Before we left for the weekend, I got the sleeves themselves cut out and sewn onto the lining layers. While travelling, I cut the edges and attached the ribbon binding. I hadn't had time to do the zigzag on the pane cuts, and my one attempt to do this by hand convinced me that this would be an excellent way to shred my sleeves, so that's where I quit for the weekend.
I also did a little tinkering with beads. I'm going to put pearl clusters at the top and bottom of each slit on the sleeves, partly for decoration and partly because I think that the sewing is going to get a bit ugly right there. Here are some examples. I have enough of these for the sleeves.

Tuesday, April 12, 2005
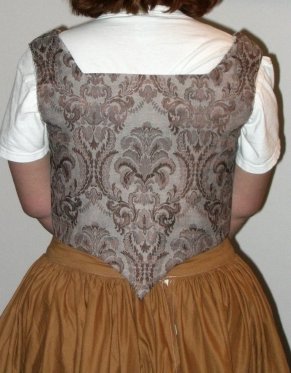
bodiced!!
Thanks Strongbad.
So here we have the front view of the bodice. Note that I'm still wearing my stylish grad school t-shirt. That's b/c yesterday's pictures were taken yesterday morning and today's pictures were taken yesterday evening...um, night. So I do laundry, really I do.

A couple of comments about these pictures:
(1) No, I won't be lacing this with Christmas ribbon, but it was handy (and slightly more durable than yesterday's yarn.
(2) I'm going to be redoing the armholes. The dress engineer (he prefers un-dress engineer) marked them correctly, then I proceeded to ignore the seam allowances last night while sewing them together, resulting in armholes that bind a bit. Not too bad, but could use a bit of an adjustment.
(3) This is probably obvious to anyone with a brain, but I'm going to need to wear my petticoat under the corset, not over as I planned. Otherwise, getting the low point, petticoat, and um, mysterious corset-cover stomacher thingie to come together correctly will be a challenge. I hadn't considered that.
(4) I need to do some topstitching to get the edges to sit correctly, but that'll get taken care of with the trim.
(5) The straps aren't as far out as I think a Venetian dress would be, but this was a deliberate design thing. I play the harp, and so this dress has to work with that. Straps all the way out on the point of my shoulders would make that unpleasant if not impossible.
(6) It kind of looks like the shoulder straps are pooching a little, but I think that's from putting my arms behind my back. I'll have to check, but I think it's ok actually. It looks normal from the side with the arms in a more natural position.
Right then, moving on, here's the back with my critical comments.
(1) Again, a bit of wrinkling where the straps start. I'll have to tug on that to simulate skirt weight and see if it helps. If not, I may just be living with it.
(2) Boning goes all the way down the point in the back. I think the stiffness helps.
So that's the bodice! Up next is redoing the armholes for comfort, then probably embellishing. I'm thinking about little orange bands around the opening, perhaps with clusters of pearls or pearls and amber beads.
So here we have the front view of the bodice. Note that I'm still wearing my stylish grad school t-shirt. That's b/c yesterday's pictures were taken yesterday morning and today's pictures were taken yesterday evening...um, night. So I do laundry, really I do.

A couple of comments about these pictures:
(1) No, I won't be lacing this with Christmas ribbon, but it was handy (and slightly more durable than yesterday's yarn.
(2) I'm going to be redoing the armholes. The dress engineer (he prefers un-dress engineer) marked them correctly, then I proceeded to ignore the seam allowances last night while sewing them together, resulting in armholes that bind a bit. Not too bad, but could use a bit of an adjustment.
(3) This is probably obvious to anyone with a brain, but I'm going to need to wear my petticoat under the corset, not over as I planned. Otherwise, getting the low point, petticoat, and um, mysterious corset-cover stomacher thingie to come together correctly will be a challenge. I hadn't considered that.
(4) I need to do some topstitching to get the edges to sit correctly, but that'll get taken care of with the trim.
(5) The straps aren't as far out as I think a Venetian dress would be, but this was a deliberate design thing. I play the harp, and so this dress has to work with that. Straps all the way out on the point of my shoulders would make that unpleasant if not impossible.
(6) It kind of looks like the shoulder straps are pooching a little, but I think that's from putting my arms behind my back. I'll have to check, but I think it's ok actually. It looks normal from the side with the arms in a more natural position.
Right then, moving on, here's the back with my critical comments.

(1) Again, a bit of wrinkling where the straps start. I'll have to tug on that to simulate skirt weight and see if it helps. If not, I may just be living with it.
(2) Boning goes all the way down the point in the back. I think the stiffness helps.
So that's the bodice! Up next is redoing the armholes for comfort, then probably embellishing. I'm thinking about little orange bands around the opening, perhaps with clusters of pearls or pearls and amber beads.
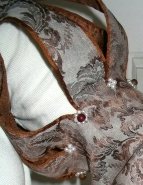
Monday, April 11, 2005
sneak peek
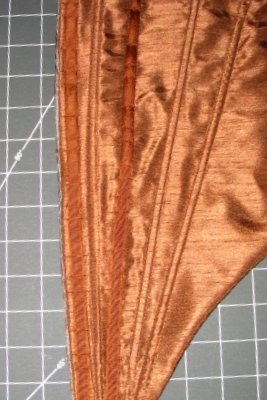
I haven't got so much in the way of patience, so although it's not done yet, here's a bit of a look at how the bodice is coming along. This was my project for yesterday, and while I didn't quite complete it, I'm pretty happy! The first thing I did was to fit a toile over my newly improved corset. I decided that since I'm using such a heavily patterned fabric, I'd try to see if I could cut the entire bodice in one piece. I took the pattern I'd drafted for my last dress, added points front and back, removed the side seams, and slashed the v-shaped opening up the middle. I cut this out of muslin and then got my husband to help with some revisions on it. He's really good at this for some reason. I think it's the engineering bent. He'll look critically at the fit for a couple of minutes, then say that I should take up the straps a bit or narrow the shoulders or whatever. Yesterday I introduced him to the notion of drawing directly on the toile. This was exceedingly popular, especially since in adjusting the arm-scythe, I happened to get accidentally poked with the pen a number of times. Urgh. Anyway, he did really nice job, so I cut out my lining and interlining, then got him to look at them again. After a thumbs-up from the dress engineer, I added a bit of boning. You can see the boning pattern for the back here:

and the front here:

Following Julie's example, I ran pieces of boning up over the shoulders again. I think she got this idea from Sempstress. It worked for the corset; hopefully it will work here as well. The boning is pretty light in the dress, but I've given up hope that I'll be able to wear this sans corset anyway....with that ladder lacing in the front, I think it would be pretty unattractive.
The ladder lacing is held in place with a double row of ribbons after Jen Thompson's example. It worked really well once I actually went to her description and did it correctly, duh. I put the ribbon strips directly over my boning and stitched right through them. My sewing machine wasn't delighted with this, but it did do a fine job of securing everything into place. Helpful hint #1: don't use a plastic yarn needle to lace the dress; they don't respond well to shear stress. I really like the ladder lacing, although I'll have to figure out what I want to lace the dress with exactly. Helpful hint #2: single-ply worsted isn't a good choice, even for a test fit...single-ply = pulls apart...duh again. Here's a close-up of my lacing strips. Note that there are extra points sewn across. Right...ready, fire, aim.

No pictures of the outside just yet. I've got the lining and outside sewn together, but need to sew up the armholes before modeling it. More commentary on that tomorrow.

and the front here:
Following Julie's example, I ran pieces of boning up over the shoulders again. I think she got this idea from Sempstress. It worked for the corset; hopefully it will work here as well. The boning is pretty light in the dress, but I've given up hope that I'll be able to wear this sans corset anyway....with that ladder lacing in the front, I think it would be pretty unattractive.
The ladder lacing is held in place with a double row of ribbons after Jen Thompson's example. It worked really well once I actually went to her description and did it correctly, duh. I put the ribbon strips directly over my boning and stitched right through them. My sewing machine wasn't delighted with this, but it did do a fine job of securing everything into place. Helpful hint #1: don't use a plastic yarn needle to lace the dress; they don't respond well to shear stress. I really like the ladder lacing, although I'll have to figure out what I want to lace the dress with exactly. Helpful hint #2: single-ply worsted isn't a good choice, even for a test fit...single-ply = pulls apart...duh again. Here's a close-up of my lacing strips. Note that there are extra points sewn across. Right...ready, fire, aim.

No pictures of the outside just yet. I've got the lining and outside sewn together, but need to sew up the armholes before modeling it. More commentary on that tomorrow.
overdue pictures
So I finally hauled out the camera this weekend and took pictures of those things that I claimed to have done. So then, here we have the updated corset, shown over my very stylish grad school t-shirt (it was free). It is maybe not too possible to tell here, but there's a line of boning on the neck-ward side of the shoulder strap and two tucks on the shoulder-ward side. This distributes the load of whatever skirts I stick on the tabs at the bottom up onto my shoulders and makes the whole experience a lot more comfortable. I wore this for much of yesterday while sewing and was able to (1) breathe, (2) move around and kneel to cut fabric, and (3) avoid ripping it off in frustration. I think these are good signs.

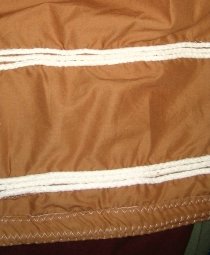
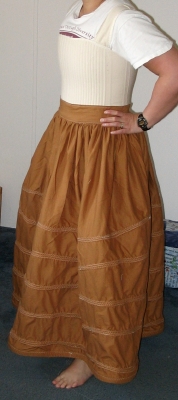
The next picture is of the corded petticoat. As I mentioned some time ago (when I was claiming to have done this, right?), it's not gored because (1) I thought it would make it poofier and (2) I'm lazy like that. It's squashed a little flat here from the lovely and graceful (and cranky) Miss Mo's determined efforts over the week to make it into her new bed, but you get the idea. Note to self: research whether cat hair is period. It's definitely not beautiful, but I think it'll work.

And for those who would like to laugh at my non-existent ability to sew straight, here's what the petticoat looks like inside. I zigzagged three rows of cording directly onto the skirt for maximum ugliness. So lovely, but my rule about machine stitching doesn't apply to what won't show, so I don't mind too much.

The next picture is of the corded petticoat. As I mentioned some time ago (when I was claiming to have done this, right?), it's not gored because (1) I thought it would make it poofier and (2) I'm lazy like that. It's squashed a little flat here from the lovely and graceful (and cranky) Miss Mo's determined efforts over the week to make it into her new bed, but you get the idea. Note to self: research whether cat hair is period. It's definitely not beautiful, but I think it'll work.
And for those who would like to laugh at my non-existent ability to sew straight, here's what the petticoat looks like inside. I zigzagged three rows of cording directly onto the skirt for maximum ugliness. So lovely, but my rule about machine stitching doesn't apply to what won't show, so I don't mind too much.

Wednesday, April 06, 2005
photo impaired
Okay, so I can't remember to take pictures to save my life. It never seems worth the bother of lacing stuff up just to take a picture, and whenever I'm working on something it doesn't seem worth stopping to take a picture. Especially since I'm always convinced that it'll be better shortly anyway.
Despite the abject lack of evidence, the outfit proceeds apace. The corded petticoat is complete. I ended up using a total of (if I did the math correctly) 60 yards of cording. That just seems ridiculous. It's ok, it could just be that I did the math wrong. I certainly did it wrong when attaching the waistband the first time. It was 5 inches too big. 5 inches. Not going to be getting that engineering degree any time soon I can see. Ahem. I'll post a picture soon. Really.
Corset 1.2 is also complete. I'm sort of excited about this. It now has straps. Big sturdy straps. Big sturdy straps with boning even. Actually, big sturdy straps with boning and little pleats on the outer edges that relate to period in no way that I've been able to find. But no matter. They stay up, and that's the thing, or rather, that's the minor thing. The major thing is that now when I put on skirts over the tabs, the weight seems to be distributed to my shoulders rather than my hips, which was the whole point of adding these straps. To test this, I put on my old dress (with the too-long non-load-bearing straps) along with a couple of extra underskirts. I wore this around for a while as I worked on other things. I didn't have the urge to rip it off. This is good.
Subscribe to:
Posts (Atom)