Wednesday, May 31, 2006

out and about

 Posted by Picasa


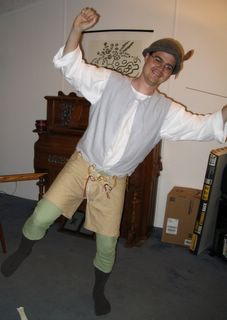
The Virginia Faire this year was hot, hot, HOT, so we were sans sleeves for the most part. Julie did get brave and tie hers on for sake of the picture. We’ve agreed that we will probably never match so nicely again!

 Posted by Picasa


Here are the four of us at the end of the day wielding our wondrous parasols, which really helped with the heat. The verdict’s still out on whether these are really period, but this research suggests yes, and I’ll support any research that’ll make me less hot! The guys have their new peasanty garb, and I’ve got a black and green pinned-on partlet based on one of the designs in The Tudor Tailor, which I really like incidentally.

 Posted by Picasa


We got to talk with Norm the Pikeman, who has the most amazing store of knowledge on military history. We enjoyed chatting with him, and he also had the guys learn some pike moves. I think in this one maybe they’re poking a bad guy, but not a bad guy on a horse, but I couldn’t say for sure, having placed myself very far from the guys with the poke-y sticks.

 Posted by Picasa


I still have a handful of things that I’d like to do for this outfit before I put it away for the next faire. Namely:

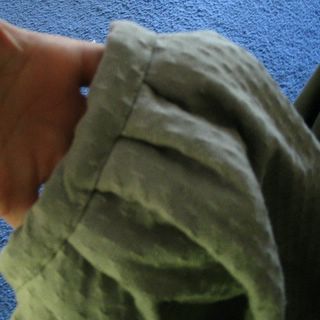
1. Finish the sleeves. They’re presently ribbon-bedecked, so I need to replace that with matching linen guards. I think while I’m at it, I might try to make them a little bigger; I see no reason that I can’t expand them with a little gusset disguised as a stripe so they’ll fit over a puffier chemise than the peasanty one that the original sleeve was designed for. Also, I’m going to go ahead and line them. I wasn’t going to, but really, I’m not going to wear these unless it’s something other than 90F so...why not?

2. A hat. I rather covet one of those tall bulbous ones, but I’ll be looking into that shortly. I’ve never made a structured hat before, so we shall see! I did admire some arch-brim ones that were being made by a woman at the faire, but it seems like almost everyone on the court who wears a stiff hat wears one of those, and I’d like something a bit different.

3. Some sort of embellishment for the guards. I am thinking about just couching down some white or grey cording of some sort. I’ll need to figure out a design.

4. A pouch. I made one the night before of black and green linen which is perfectly serviceable, but I also started an embroidered design on black linen with wool while at the faire, which I think would be nice done up in much the same way. It’s not very well executed, but I’m new to embroidery (other than backstitching!) and was making it up while sitting on hay. I’ll post some pictures if it doesn’t turn out completely terrible.

Thursday, May 25, 2006

compromises

Since there is pretty limited time remaining to make this outfit wearable, I decided to make some compromises. It’s going to be really hot this weekend, so I decided not to worry about fixing the sleeves. They need to have all of the ribbon trim replaced with linen guards, and I’m not very happy with the fit on them anyway. So then, they’re off the list. That’s ok, though, since I replaced that handwork with something else! I decided to edge my existing partlet with black (and not-so-incidentally, monofilament to stand up better). I finished it last night, but all I have is this partway done picture. There is now also black edging (and monofilament) down the front edge as well, which makes a nice contrast and also causes the front to curve out nicely.

 Posted by Picasa


I had originally thought that I’d just thread the monofilament through the existing ruffle to give it more body, but that proved to be nearly impossible, which is when I decided to whipstitch black embroidery floss over it. It turned my basically flat box pleats into something closer to a ruff. I say “closer” because if I’d wanted a figure 8 ruff, I should have used a 5-1 pleating ratio instead of 3-1…there’s not enough fabric to force it into figure 8’s without distortion. The other thing that I did to get the ruffles to behave was to run a line of linen thread through the ruffle about halfway down, sort of like doing cartridge pleating after the fact. Without it, the stiff top edge could contort into a bunch of different configurations, but with it, there’s really only one choice.

I did a little playing with a really classy brooch I got from Goodwill. Here it is before in all of its rhinestone-bedecked glory:

 Posted by Picasa


And here it is after I pried out the rhinestones and glued in adventurine beads and glass pearls. Sorry the picture quality on the tacky before is so much better.

 Posted by Picasa

While I had all the layers on to mark the hems, I had the dress engineer snap a shot showing the amount of “boo-tay” generated by the padded pleats in the underskirt. I’m wearing a farthingale, a simple gathered petticoat, the stiffer gored grey petticoat, and the knife-pleated dress. I just can’t warm to the whole bumroll concept, as I’m sure I’d end up with it badly positioned, but I think this looks pretty full.

 Posted by Picasa


So indeed, it looks like the hems really will be done at the last minute. How….shocking…. The dress engineer graciously crawled around on the floor with scissors. His opportunities for poking me were pretty limited by the farthingale (yay armor), so it was a much faster operation than usual. I just need to add hems to the petticoat and dress and then I think I’ll be all set! I wish I had a tall hat to go over the caul, but there’s just not time. I also have assorted plans to couch and/or bead the guards on the dress, but that was never in the plan for this time around.

Monday, May 22, 2006

strike a pose

There was a fair bit of sewing this weekend, but I wasn’t in the mood to model it myself, so I thought it only fair that these guys should earn their kibbles. That’s right, I’m one of *those* people. Those people who dress up their pets.

 Posted by Picasa


Here’s Lucy, looking sweet yet flirtatious in a single shoulder roll, stuffed with linen scraps for a nice firmness. Cutting and sewing all those little loops was somewhat of a nuisance, but I couldn’t resign myself to the spiral I was thinking of doing. It was messy, and I couldn’t remember if I’ve seen a portrait. I’ve only got one sewn on the dress as yet.

 Posted by Picasa


Yep, plainly born to model. Look at that eyeliner. All natural that. We were out on a hike one day and had a stranger comment on her eyes. I told her it was a real pain getting the dog to hold still for the eyeliner. Boy did she ever give me a dirty look. Sheesh people, no, I don’t put makeup on my dog. Only dirty socks on occasion.

 Posted by Picasa


And next up we have the debonair Dexter Dog modeling a ….hey wait. Is that poor dog wearing a snood? Oh man. His union rep is going to have something to say about this. Ahem. So here’s the finished caul at any rate. I’ll probably wear it at somewhat less rakish of an angle.

 Posted by Picasa


Here’s the closeup of the beading prior to making it into a little caul and using it to offend my dog’s sensibilities. This was really a fun way of doing a cheater net. I just used backstitching through the beads, so everything was done in two perpendicular passes. No going back and sewing on beads afterwards.

 Posted by Picasa


And well, yeah, here’s my hand modeling the 4th take on putting a waistband on the petticoat. I didn’t really think putting the petticoat on the cat was going to go over so well. I think this time it actually worked. It’s possible that I got a wee bit smarter and did some pinning this time. I also padded the pleats on the backside with two layers of felt for additional butt-tastic-ness.

By my count, that just leaves me with one shoulder roll to attach, a bottom guard to add, two hems to do, a partlet to make, and possibly some sleeve trim to replace. By Friday. Eh. No problems.

Thursday, May 18, 2006

girdle

There’s been a brief hiatus in sewing, mostly due to the arrival of my order from Fire Mountain Gems. (Ooh, bright shiny object over here!)

 Posted by Picasa


The big ivory-colored ones are aragonite, the small peach ones are adventurine, the fake pearls are…fake pearls, and the green ones are some random rock that simulates jade, jade being too expensive for me. It’s strung on the heaviest gauge tigertail that I could get and held together with several crimp beads, which I pretty much squashed into oblivion, not having a proper crimping tool. No matter. Originally, there were supposed to be tiny garnet beads on there, but they were so small that they were stripping the wire, so I substituted the pearls.

 Posted by Picasa

Tuesday, May 16, 2006

guards

Ok, so Blogger decided to cooperate with the picture-posting for a moment, so here's a post from a couple of days ago.

Projects grow, no? This one sure is, although mostly it’s a matter of redoing more and more things. I was thinking last night (don’t laugh, it happens on occasion). I was wondering whether it’s really true that every time I take a shortcut in sewing it ends up taking me three times as long as if I did it right in the first place. Maybe it’s just that I only remember those cases. Here's a before and after of the guards (the before is on the left in grosgrain, the after is on the right in linen.)

 Posted by Picasa


Anyway, I'm done with the guard makeover, excepting the one that'll go on the bottom once I measure the hem. If you recall, I had decided that the shiny cheap grosgrain ribbon was blinding me and hurting my head (the part of my head which contains my vanity mostly). Ahem. So I sucked it up and made some nice linen guards. While I was at it, I changed the widths a wee bit to make it more visually pleasing. Or more visually pleasing to the dress engineer at any rate, and if he’s happy, I’m happy. One kind of nice thing about making my own guards was that I could taper the guards down the sides of the skirt, which I think looks nicer than the way it was before. I have all kinds of future ideas for couching something on the guards and perhaps beading the forepart and etc etc etc , but there’s no way that could happen by the deadline, so it’ll have to wait. Particularly since I've gone back to my normal "no machine stitching showing" rule. If I'm going to take the time to do this, I may as well do it right.

So yes, I’m committed to either replacing the ribbon on the sleeves or else making a new set. Right now, I’m leaning towards the latter. I think it would probably be less work. Also, since I’m about out of green fabric, that’ll be a nice excuse to use something breathable. We shall see. I might leave that for last, since sleeves at Virginia faires last approximately 10 minutes or until the pictures are taken or the contest is judged or whatever.

Monday, May 15, 2006

the best laid plans...

What I planned to do this weekend:

1. Complete farthingale.
2. Make quick petticoat.
3. Take up dress shoulder straps to remove ugly wrinkles in bodice (and distribute weight better).
4. Remove skirt from bodice and reattach properly.
5. Add length to bottom of skirt.
6. Hum smugly to myself about productivity and plan fun accessory-making binge.

What I actually did this weekend:

1. Completed farthingale.

2. Made petticoat. Tried on petticoat. Discovered pleating at waist left unsettling u-shaped wrinkle under waist. Ripped off waistband. Repleated. Re-tried-on. Re-muttered-ugly-words. Ripped off waistband again. Left on chair to be dealt with later.

3. Took up dress shoulder straps. Realized I had no circulation in arms, due to armscythe now being too short (duh). Cut armscythes deeper. Decided to edge with ribbon. Decided ribbon was ugly. Set aside to deal with later.

4. Removed skirt from bodice. Cheerily reattached to bodice properly. Tried on over farthingale and (incomplete) petticoat. Discovered that center now dips alarmingly low at hem. Muttered additional dire threats at mirror. Removed skirt. Reattached to bodice, paying attention this time. Tried on again. Discovered ugly sag at waist (no clue how that happened). Additional mumbling under breath. (Hi Mom! I was mumbling about sunshine and rainbows....) Fixed the sag, and decided to go ahead and remove a trapezoid from the front center on each side so forepart would show more. That actually was probably a good idea.

5. Decided that before I could add length, must fix newly hacked front edges. Hesitated between 1/2 yard of black cotton flannel and 3 yards of black linen. Decided on flannel for ease of non-fraying-ness. Added to front edges and bottom.

6. Looked at black fabric bands next to black ribbons on skirt and decided that the ribbons looked terrible. Decided to replace ribbons with fabric bands. Looked upward, realized that there are more of them on the bodice. Looked across room and discovered more ribbons on newly-completed sleeves. Then looked at my flannel and realized I didn't have enough anyway, so would have to rip that off and use linen after all. Decided to have a bit of a lie-down.

What I learned this weekend:

1. It's not such a great idea to revamp an existing dress. It's at least as much work as making a new one.

2. All of the contrasting guards on the dress really ought to match. It seems obvious in retrospect, but I seriously thought that just a couple made of a completely different material in the same color would be perfectly fine. They're not.

3. Even though I want a flat front on the petticoat (to serve as a visible forepart), it's still necessary to put some pleats in the front half of the skirt. Maybe not in the very center, but definitely to either side of center. Otherwise, you get the dreaded u-wrinkle.

4. Farthingales are fantastic for shooing cats and dogs out of one's way.

Pictures I took this weekend: Only this one. Everything is in a state of partly done.

 Posted by Picasa


Seems like somebody needs to take a farthingale to this dog. Shoo! (Oh, and that's my petticoat material, by the way. See the cool little diamond pattern? No? All you see is a big orange mutt? Oh well.)

Saturday, May 13, 2006

farthingale'ed!!!

 Posted by Picasa


Heh. I like my farthingale. It's quite narrow actually, but this is based on the 22" fabric from Alcega, so I'm guessing this is about right.

It took about two and a half yards of pale yellow cotton fabric, about 50 feet of 5/8" outer diameter hard plastic tubing, a similar amount of ribbon for the casings, and about 12 inches 1/2" OD plastic tubing. I used the smaller tubing to join the ends of the larger tubing used for the hoops. That's pretty much how I connect non-critical tubing in the lab, too.

I had a couple of problems with construction, basically because I'm a moron. First of all, I cut it out a little bit short. I just randomly guessed how much to add to the length to account for the conical shape, and apparently I was wrong. It wasn't a big deal, as I just added a few inches to the top of the skirt. I also bought ribbon that was too small, so the green ribbon is actually two pieces franken-stitched together (ugly). The yellow ribbon I found in my drawer (handy that). The drawstring waist is because I was tired of fiddling with the waistband trying to get the skirt to hang just so. The drawstring is a heckuva lot easier, and is allowing additional tinkering while I work on the next layer.

Ooh la la.

 Posted by Picasa

Wednesday, May 10, 2006

stripey sleeves

 Posted by Picasa


So why did I even bother to make an ordered, prioritized list anyway? I knew I wouldn't follow it! I decided to do the sleeves first, since that way I know they'll definitely get done. I'm using Julie's basic curved sleeve pattern (thank you!!), since it worked so well last time and since drafting sleeves ain't exactly a real strength of mine. I decided I wanted stripey sleeves, and they're going together fine except for the fact that once I had the stripes all applied, I realized that I did them exactly backwards of what I wanted. Ah well. I am, incidentally, utterly throwing out my "no machine stitching showing" rule for this little quickie project. I decided I couldn't handle wasting hand-stitching on the all-synthetic-all-the-time dress. For this dress, the new rule is "machine stitching is ok unless it looks really really terrible." I'll go back to the normal standard for the next dress, which with any luck will be silk. Much easier to justify the labor then.

Monday, May 08, 2006

ok, so enough with the boy clothes already

That's right. It's three for me, one for him. Which means I now get three new dresses. Ok, so maybe it won't really work that way, but there's one thing that I really would like to do before meeting up with Julie. She'll be debuting her green Venetian dress, and I will have nothing new to wear. (I can feel your sympathy.) None of the dress ideas I've got in mind would be doable in 2 weeks, or at least, none of them would be a good idea to try to do in 2 weeks, so here's the plan. I have this generic green dress that was my first attempt at "something period." It's got a ton of problems and probably isn't worth the trouble, but here's the thing: I like it. So then, here's the problem child:

 Posted by Picasa


And here's the plan to make it a little more of a reasonable approximation of a middle class dress, prioritized so if I don't actually get it all done, the dress will hopefully be in wearable condition.

1. Tweak the bodice to make it wearable over my existing corset. The number one problem I have with the dress is that the silhouette is wrong. I've tried it on over the corset, and the girth is about right, but the shoulder straps are way too long, meaning that there are unsightly puckers under the arms and also that the corset shows at the top. I think that this can be 90% fixed by simply shortening the straps a couple of inches.

2. Make a farthingale. That'll make the skirts bigger and my legs cooler I hope. (This'll necessitate all kinds of lengthening of the skirts of course, but such is life.)

3. Remove the skirt at the waist and reattach properly. Possibly also remove the front panel from each, but it'll depend on how it hangs over the farthingale. The addition of the farthingale might be sufficient to spread the front of the skirt. If not, snip snip.

4. Add length to the skirt. I am pretty darn sure I don't have enough fabric leftover to do this properly (i.e. by hiding it under the ribbon) so I think it's getting a wide black guard at the bottom.

5. Make a new underskirt/forepart. No clue what that will be yet. Might even go shopping for that (it's only a yard, right?)

6. Make sleeves. I DO have enough green fabric left to eke out some sleeves, provided they aren't enormous.

7. Make a partlet, and wear it with my linen chemise. Could probably get away with the Flemish partlet, and probably will do that.

8. Make a caul to wear with the hat. This isn't so much optional since my hair is shorter now. However, it's at the bottom of the list because if I had time, a little blackwork design on it would be fun. Looking at this list, I probably don't have time.

9. And last but not least, if I had all the time in the world, I'd replace the ribbons on the dress with guards made of actual fabric. That would take a while and just be silly, so yeah...just mentioning it.

10. Oh well...ok so one other thing. A new girdle would be great. But I don't see it happening.

Ok that list is ridiculous. Here's what I'm really probably going to do: take up the bodice so it fits over a corset, make some sleeves and make a caul to cover my short hair. That'd make it wearable.

spoon!

 Posted by Picasa


Ok, so this spoon isn't exactly what I had in mind. Maybe I'll find a better one before faire, but it was the best thing in my drawer. I sewed it on nice and tight so we won't have any "domestic disputes" or anything. This is the felted hat that I'd considered making a while back. It actually worked out better than I expected. The yarn is some that I spun myself, meaning that it was virtually useless for any actual knitting, due to over-twist, under-twist, thick-and-thin, you name it. Also, the wool was so coarse that I wasn't ever going to wear it anyway. I simply knitted a baggy hat that came down all the way to my chin, then washed it and washed it and washed it. Some people say that felting requires a lot of careful watching and stuff. Those people probably have their hats turn out all the time. How boring.

Ok, so here's the finished outfit. I trust it'll look a bit nicer with some accessories. I've also since over-dyed the jerkin to a darker grey since the pastel-ness of it all was getting to me. Oh....and as always, I haven't got any decent cord on hand, so it's tied together with yarn. That'll get tidied up as well before we go out and about. I gotta say that this is definitely not my favorite outfit ever, but it should be cool and comfortable to wear.

 Posted by Picasa


Okay, if squeamish, go ahead and avert your eyes, because here is the up-close codpiece shot. This is not so much to torture you as to show you how all these clothes tie together. I still find the idea of tying ones pants to ones top baffling. Guess they hadn't invented what Aaron refers to as "belt loop technology."

 Posted by Picasa


Oh, and just to give Julie's Adam some dancey pants company. He's such a sport.

 Posted by Picasa


I think he's dancing with joy at the idea of me no longer making him try on green hose.